Applying Face Masks with Flutter’s ARKit Plugin on iOS
Posted on Jul 1, 2024 • 4 min read

Jaimin Modi
Applying Face Masks with Flutter’s ARKit Plugin on iOS
In this tutorial, we will explore how to apply an AR Effects mask or you can say filters on your face. And we will see it live in action without using any third-party provider like DeepAR. We’ll be using only Flutter’s arkit_flutter_plugin.
Utilizing the Power of Flutter
One of the most fascinating aspects of using Flutter is gives you the availability to access and work for multiple mobile platforms like Android and iOS.
Building an AR Application Using ARKit and Flutter
Augmented Reality (AR) is an exciting technology that overlays digital content in the real world. In this tutorial, we will walk you through the process of creating an AR application using the ARKit Flutter plugin. The ARKit Flutter plugin is a Flutter plugin for iOS ARKit that provides a Dart API to interact with ARKit.
Prerequisites
Before we get started, make sure you have the following installed:
Flutter SDK
Xcode (since ARKit is available only on iOS)
An iOS device (ARKit does not work on the simulator)
Step 1: Setting Up the Flutter Project
1. Create a new Flutter project
Open your terminal and run:
flutter create arkit_example
cd arkit_example
2. Open the project in your favourite IDE (such as VSCode or Android Studio)
3. Add the ARKit Flutter plugin to your pubspec.yaml
dependencies:
  flutter:
    sdk: flutter
  arkit_plugin: ^0.6.0
Then run flutter pub get to install the plugin.
Step 2: iOS Configuration
1. Open the ios/Runner.xcworkspace in Xcode
2. Update the Info.plist
Open ios/Runner/Info.plist and add the following lines to request camera access:
<key>NSCameraUsageDescription</key>
<string>We need camera access to provide augmented reality experience</string>
Step 3: Building the AR Application
1. Create / Open a new Dart file for your AR experience
Import the AR Kit Plugin:
import 'package:arkit_plugin/arkit_plugin.dart';Setting up AR Controller for face tracking only
import 'package:flutter/material.dart';
import 'package:flutter/cupertino.dart';
import 'package:arkit_plugin/arkit_plugin.dart';

class FaceTrackingScreen extends StatefulWidget {
  const FaceTrackingScreen({super.key});

  @override
  State<FaceTrackingScreen> createState() {
    return _FaceTrackingScreenState();
  }
}

class _FaceTrackingScreenState extends State<FaceTrackingScreen> {
  late ARKitController arkitController;

  ARKitNode? node;

  ARKitNode? leftEye;
  ARKitNode? rightEye;

  @override
  void dispose() {
    arkitController.dispose();
    super.dispose();
  }

  @override
  Widget build(BuildContext context) => CupertinoPageScaffold(
        navigationBar:
            const CupertinoNavigationBar(middle: Text('Face Detection Sample')),
        child: Stack(
          children: [
            ARKitSceneView(
              configuration: ARKitConfiguration.faceTracking,
              onARKitViewCreated: onARKitViewCreated,
            ),
          ],
        ),
      );

  void onARKitViewCreated(ARKitController arkitController) {
    this.arkitController = arkitController;
    this.arkitController.onAddNodeForAnchor = _handleAddAnchor;
    this.arkitController.onUpdateNodeForAnchor = _handleUpdateAnchor;
  }

  void _handleAddAnchor(ARKitAnchor anchor) {
    if (anchor is! ARKitFaceAnchor) {
      return;
    }
    final material = ARKitMaterial(fillMode: ARKitFillMode.lines);
    anchor.geometry.materials.value = [material];

    node = ARKitNode(geometry: anchor.geometry);
    arkitController.add(node!, parentNodeName: anchor.nodeName);

    leftEye = _createEye(anchor.leftEyeTransform);
    arkitController.add(leftEye!, parentNodeName: anchor.nodeName);
    rightEye = _createEye(anchor.rightEyeTransform);
    arkitController.add(rightEye!, parentNodeName: anchor.nodeName);
  }

  ARKitNode _createEye(Matrix4 transform) {
    final position = vector.Vector3(
      transform.getColumn(3).x,
      transform.getColumn(3).y,
      transform.getColumn(3).z,
    );
    final material = ARKitMaterial(
      diffuse: ARKitMaterialProperty.color(Colors.yellow),
    );
    final sphere = ARKitBox(
        materials: [material], width: 0.03, height: 0.03, length: 0.03);

    return ARKitNode(geometry: sphere, position: position);
  }

  void _handleUpdateAnchor(ARKitAnchor anchor) {
    if (anchor is ARKitFaceAnchor && mounted) {
      final faceAnchor = anchor;
      arkitController.updateFaceGeometry(node!, anchor.identifier);
      _updateEye(leftEye!, faceAnchor.leftEyeTransform,
          faceAnchor.blendShapes['eyeBlink_L'] ?? 0);
      _updateEye(rightEye!, faceAnchor.rightEyeTransform,
          faceAnchor.blendShapes['eyeBlink_R'] ?? 0);
    }
  }

  void _updateEye(ARKitNode node, Matrix4 transform, double blink) {
    final scale = vector.Vector3(1, 1 - blink, 1);
    node.scale = scale;
  }
}
2. Update main.dart to navigate to the ARView
Modify lib/main.dart to include a button to navigate to the AR view:
import 'package:flutter/material.dart';
import 'ar_view.dart';

void main() {
  runApp(MyApp());
}

class MyApp extends StatelessWidget {
  @override
  Widget build(BuildContext context) {
    return MaterialApp(
      title: 'ARKit Flutter Demo',
      theme: ThemeData(
        primarySwatch: Colors.blue,
      ),
      home: MyHomePage(),
    );
  }
}

class MyHomePage extends StatelessWidget {
  @override
  Widget build(BuildContext context) {
    return Scaffold(
      appBar: AppBar(
        title: Text('ARKit Flutter Demo'),
      ),
      body: Center(
        child: ElevatedButton(
          child: Text('Go to AR View'),
          onPressed: () {
            Navigator.push(
              context,
              MaterialPageRoute(builder: (context) => FaceTrackingScreen()),
            );
          },
        ),
      ),
    );
  }
}
The above code simply shows lines on your face. It will show yellow spheres in your eyes. Check the above code is tracking your eyes and head movements.
Let’s briefly explain each step of the animation:
onARKitViewCreated: This function will add some additional methods to handle AR-related code like
_handleAddAnchorand_handleUpdateAnchor._handleAddAnchor: This function adds the Anchor of lines when the user's face is found. It will add lines and spheres on the eyes portion._handleUpdateAnchor: This function will track the user's face and eye motion and manage the UI accordingly._createEyeand_updateEye: These functions are internal functions that add the spheres on the Eye and manage its movement.
AR Face with Lines Result:

Step 4: Adding masks and Showing them according to User’s Face
1. Adding a mask array of images and creating a local Anchor variable.
Add some variable and mask array:
late ARKitFaceAnchor localAnchor; // faceanchor that represents the mask UI on face. Also, When masks changes remove and add new mask.

late int selectedIndex = 0; // to track the current selected mask index

// mask images array
final imageArray = [
  'assets/images/mask_01.png',
  'assets/images/mask_02.png',
  'assets/images/mask_03.png',
  'assets/images/mask_04.png',
];
Modify the widget build code to show the bottom filter mask arrays list:
// Create widget to show the ARKit UI
// Modify as your need
@override
Widget build(BuildContext context) => Scaffold(
  backgroundColor: Colors.transparent,
  body: SafeArea(
    child:  Stack(
      children: [
        ARKitSceneView(
          onARKitViewCreated: onARKitViewCreated,
          configuration: ARKitConfiguration.faceTracking,
        ),
        Column(
          mainAxisAlignment: MainAxisAlignment.end,
          children: [
            FloatingActionButton(
              onPressed: () async {
                arkitController.snapshot(); // here the image will be captured. store it where you want to do. You can use GallerySaver.saveImage(path: path)
              },
              child: Icon(Icons.camera),
            ),
            const SizedBox(height: 16),
            Container(
                margin: const EdgeInsets.only(bottom: 24),
                height: 70,
                child: ListView.builder(
                    itemCount: imageArray.length,
                    scrollDirection: Axis.horizontal,
                    itemBuilder: (BuildContext context, int index) {
                      return InkWell(
                        onTap: () {
                          arkitController.remove(imageArray[selectedIndex]); // we need to remove existing mask on change on tap
                          node = null; // remove the node, to avoid adding multiple masks.
                          setState(() {
                            selectedIndex = index;
                          });
                          _handleAddAnchor(localAnchor,
                              image: imageArray[index]);
                        },
                        child: _imageContainer(
                            imageArray[index], index == selectedIndex),
                      );
                    })),
          ],
        )
      ],
    ),
  ));

// Internal code to manage the bottom mask faces thing
// Modify as your need
Widget _imageContainer(String image, bool isSelected) => Container(
  width: 70,
  height: 70,
  decoration: BoxDecoration(
    border: Border.all(color: Colors.black, width: 2),
    borderRadius: BorderRadius.circular(35),
    color: isSelected ? Colors.red : Colors.white,
  ),
  margin: const EdgeInsets.symmetric(horizontal: 8),
  padding: const EdgeInsets.all(12),
  child: ClipOval(
    child: Image.asset(
      image,
      fit: BoxFit.contain,
    ),
  ));
The widget build function manages the bottom side UI, In that we’ve added column to manage the floatingActionButton and listViewBuilder to show the bottom UI of different masks.
The _imageContair function manages the bottom side UI for showing the different masks, we’ve added a property that will add the mask name.
2. Remove the code that shows lines on your face and add a mask.
// Add node (mask) on your face
void _handleAddAnchor(ARKitAnchor anchor, {String image = 'assets/images/mask_01.png'}) {
	if (anchor is! ARKitFaceAnchor) {
	  return;
	}

	localAnchor = anchor;

	final material = ARKitMaterial(fillMode: ARKitFillMode.fill, diffuse: ARKitMaterialProperty.image(image)); // from here the code applies masks on your face

	localAnchor.geometry.materials.value = [material];
	node = ARKitNode(geometry: localAnchor.geometry, name: image); // name is given to remove the particular face mask node
	arkitController.add(node!, parentNodeName: localAnchor.nodeName);

// from here the code adds a node for the eye
    leftEye = _createEye(localAnchor.leftEyeTransform);
    arkitController.add(leftEye!, parentNodeName: localAnchor.nodeName);
    rightEye = _createEye(localAnchor.rightEyeTransform);
    arkitController.add(rightEye!, parentNodeName: localAnchor.nodeName);
}

// below code creates a node for eyes
ARKitNode _createEye(Matrix4 transform) {
    final position = vector.Vector3(
      transform.getColumn(3).x,
      transform.getColumn(3).y,
      transform.getColumn(3).z,
    );
// If you want to apply different shades to your eyes you can add them by adding ARKitMaterial and geometry for that.
    return ARKitNode(position: position);
  }

void _handleUpdateAnchor(ARKitAnchor anchor) {
	if (anchor is ARKitFaceAnchor && mounted) {
	  final faceAnchor = anchor;
	  arkitController.updateFaceGeometry(node!, anchor.identifier);
	  _updateEye(leftEye!, faceAnchor.leftEyeTransform,
	      faceAnchor.blendShapes['eyeBlink_L'] ?? 0);
	  _updateEye(rightEye!, faceAnchor.rightEyeTransform,
	      faceAnchor.blendShapes['eyeBlink_R'] ?? 0);
	}
}

void _updateEye(ARKitNode node, Matrix4 transform, double blink) {
	final scale = vector.Vector3(1, 1 - blink, 1);
	node.scale = scale;
}
The _handleAddAnchor function manages the mask code, we’ve added a property that will add the mask name. The adding or creating eye code remains the same because it's going to track your eyes. You can add other tracking events if you want to add them.
localAnchor = anchor;
final material = ARKitMaterial(fillMode: ARKitFillMode.fill, diffuse: ARKitMaterialProperty.image(image));
To show the mask image properly we have removed the sphere code in the _createEye function.
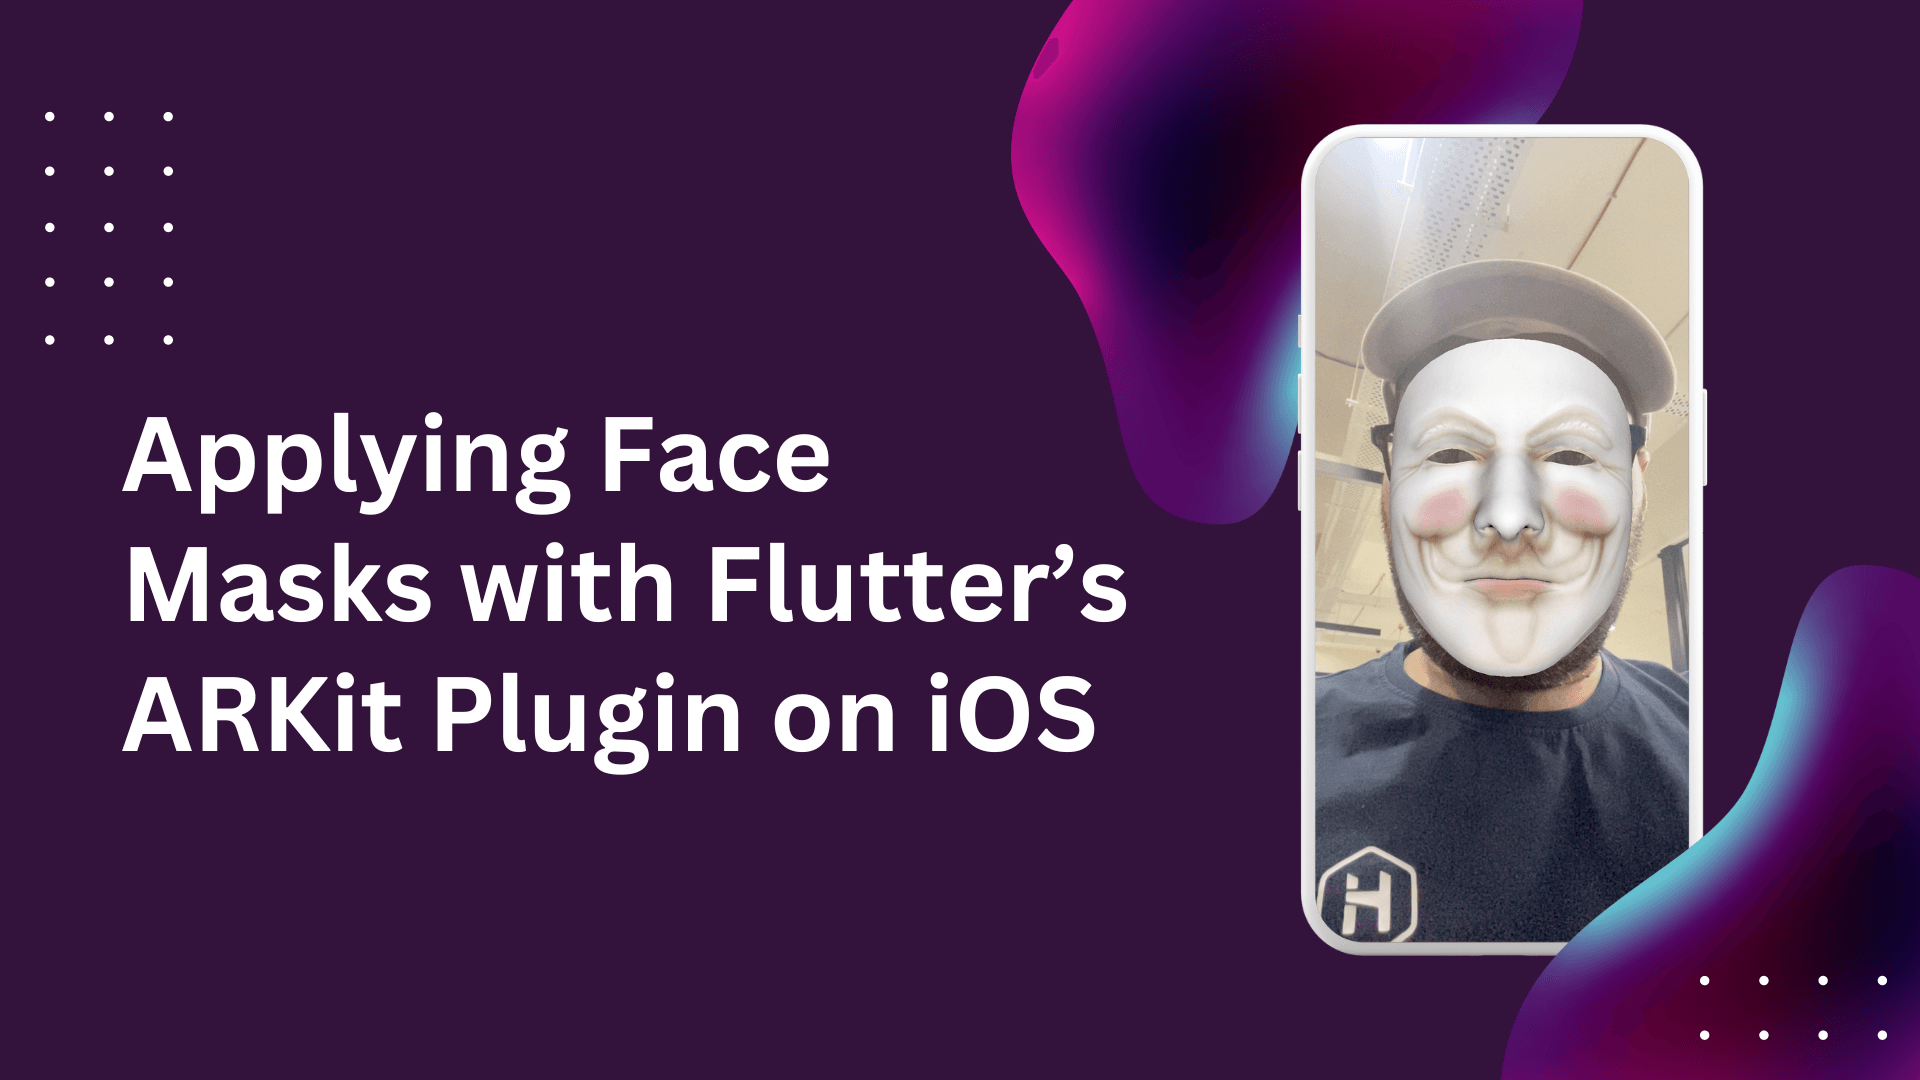
Final Result

We can also capture a video the same way we have taken a snapshot.
Saving as a Video and a SnapShot

Conclusion
In this tutorial, we have created a simple AR application using the ARKit Flutter plugin. We've set up a Flutter project, configured it for iOS, and applied some random masks on your face and you can capture photos with that applied mask. You can expand on this by adding more masks.
We can also capture a video the same way we have taken a snapshot. Feel free to leave comments if you have any questions or run into issues. Happy coding!
AWS Certified Team
Tech Holding Team is a AWS Certified & validates cloud expertise to help professionals highlight in-demand skills and organizations build effective, innovative teams for cloud initiatives using AWS.


By using this site, you agree to thePrivacy Policy.